_2022044-140204.jpg)
 Free delivery over 70€*
 Cake. Bake. Party!
 Learn with PME classes
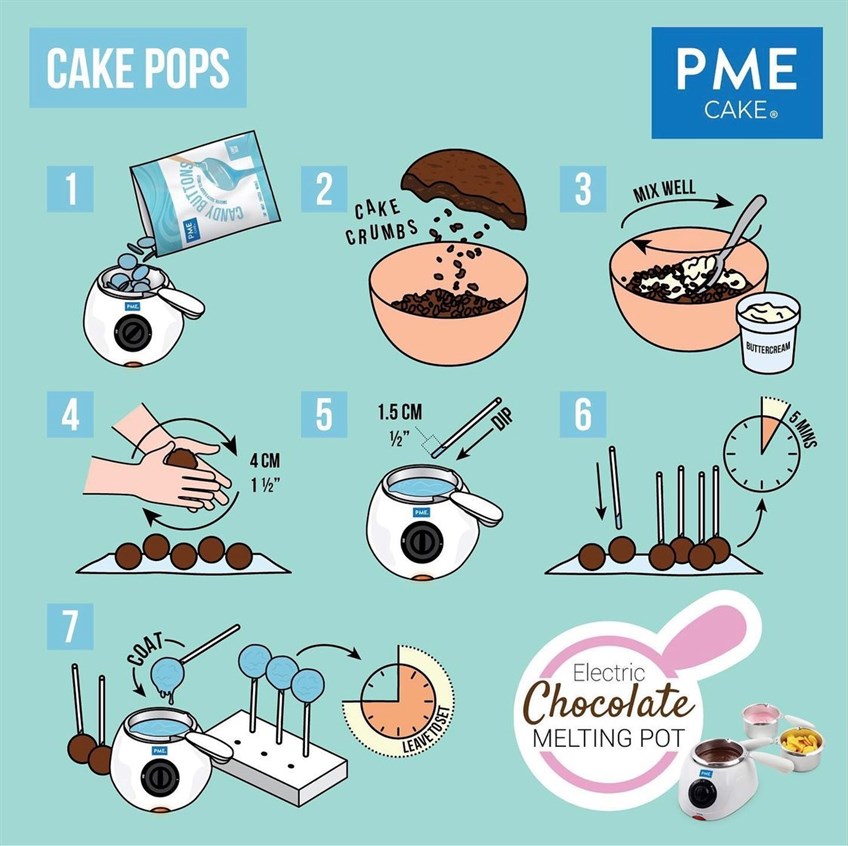
 At PME headquarters, we love cake pops but it can be difficult to make and to perfect. So we have created our top tricks and tips, so that you can also enjoy making and eating the most perfect cake pops!
- ADDING FROSTING
If you would rather roll your cake pops by hand, the first step is to bake a cake and let it cool completely. You can then crumble the cake with a can of frosting, or cream cheese, which will make your truffle like filling. The important thing here is to not use too much frosting. Start of small and then add more frosting when you need to. The more frosting you add, it will make the cake pop filling much softer. This will cause it to slide on the stick, and will already make it impossible to create the perfect cake pop. If this does happen, we recommend adding more cake crumble and keeping the cake pop filling in the fridge for longer.
- REFRIGERATING YOUR BATTER
 The next tip is to refrigerate your batter before forming it into balls. This is because it will firm up your batter, make it easier to roll and also help keep the cake pop sticks more secure. You can keep your batter in the fridge for a couple of hours or even overnight.
 - DIP THE END OF YOUR CAKE POP STICKS INTO CANDY BUTTONS
If you add a little drop of Candy Buttons at the end of the cake pop mix before putting put on the rolled cake pop as it acts as a glue and prevents your cake pops from falling off the stick.
- USING CANDY BUTTONS RATHER THAN CHOCOLATE FOR THE COATING
We recommend using our candy buttons (that come in a large range of colours) for you cake pop coating. This will act as the ‘shell’ for your cake pop, and sets up much nicer than other melted chocolate options. This will also prevent the outer shell from melting if your hands touch it, unlike regular chocolate. We also recommend using our chocolate melting pot because the 2 heat settings mean that on one you can melt and the other keeps the chocolate warm.
- DIPPING YOUR CAKE POPS INTO THE CANDY BUTTONS
When you dip your cake pops halfway into the melted candy buttons and use a spoon to coat the rest of the cake pop, as it helps to get the chocolate all around the cake pop and to also smooth of the excess chocolate off. By swirling the cake pop into the candy buttons, it prevents the cake pop falling off the stick.
- DO NOT GET WATER IN THE CANDY BUTTONS
It is extremely important to not get any water in your candy buttons, as it will turn it clumpy.
- DOING EXTRA
At PME, we love to go all out when it comes to cake decorating. Our favourite quick and effective way is putting our coloured lustre snows into the melted candy buttons for a speckled gold or silver effect.
- USE A PIECE OF POLYSTYRENE AFTER DIPPING
To prevent the coating of the cake pops to smudge or ruin, we suggest standing the cake pops upright with the sticks in a piece of polystyrene. This will allow the cake pops to dry neatly.
- SPRINKLE WITH DECORATIONS WILL THE CAKE POPS ARE DRYING
 Sprinkle your cake pops with edible decorations or sprinkles while the Candy buttons coating is still a bit wet, so that they will stick properly and it will prevent them from falling off. We like to use sprinkles, because not only does it look fun, but it also covers any imperfections in the coating.